Waffle Racing Tutorial
Waffle Racing Tutorial
Back to Top
Why Make Games
Why not? Some people build bird houses, so I make games.
Its just something to do for me. Its fun. To me its like
doing a puzzle and trying to make all the pieces fit.
Or, maybe its like making playing with a model railroad set ...
never really sure how it will all fit together, but its fun
to do. Its always a challange. I don't make any money at this,
and don't expect to. There are many people much more talented
than me, so I write my little "clumsy" games and give them away.
A main reason I got envolved with writing games was school.
When I was in high school (1979?) it was a weekend hobby for
my friends and I. Mostly when we could not think of anything to
do (D&D) and between farming jobs or mowing yards. Later,
school wanted programs to demonstraight programming concepts
and those would turn into mini-games. Then, after C++, I returned
to game writing just to stay in practice. My C++ was never very good,
so I took other kinds of jobs ... Then, DBC caught my eye.
So I play with DBC because I need not learn anything truely new.
It is easy to crunch up a basic project in a few days or less.
Now, I am retired, so I have lots of idle time and this is my
something to do.
Back to Top
Why A Tutorial
Again, something to do. I have not done an open source project
in a long time. TutWaffle.zip (my multiplayer tutorial) was
well received in its time, a few years ago. It was based on
the monster hunt tutorial by Lee Bamber. I had upgraded it to
support 9 players online(or AI players offline) and even did
a DBPro version (still available). I have had to stop using
DBPro because my 3D card is only 8MB and although DBPro claims
it will run on my system, well, it does run ... but it chokes.
FPS stays around 2. DBC plays very well. FPSC .... chokes bad.
So, for fun, I thought to do another tutorial. Something more
involved than just a tech-demo. My plan here, is to do a full-size
project from begining to end showing all the important things
that are needed. Some things, nobody wants to talk about.
This will also bring extra attention to my IDE. Not because its good,
but because I will be using here, along with my other tools.
So, this is a tutorial that will promote my tools, and my website.
Won't make me any money, but will give me more something to do.
And, maybe, someone with more experience using Scintilla will
tell me how I can improve those areas which seem to be slow?
or just poorly written.
Back to Top
Why A Racing Game
I am not too found of FPS, and there are just too many of those out now.
Puzzle Games are hard to "invent". RTS is mostly just to complex.
I may do a "Sports" game later to experiment with RTS ideas.
So I'll do a racing game. And, since I tend to go for stratedgy,
I'll try for something almost realistic. I do hope that does not
translate to "boaring". My ski race (snow mobile) game tended to be
that. Even though the race was limited to 10 laps and supported
10 players online, and featured 9 AI players, each with different
skill levels. But, it did not support collisions and did not have
a level editor. It was more of a tech-demo than a project. I coded it
very quickly for a XMass competition (my first and last one)
and was going mostly for the deadline than features. I think mine was
the only multi-player offering, but was not "FUN" offline.
So, maybe this will be my attempt to do a more complete racing game.
Back to Top
Where to Begin A new Game
Paper
There, I said something nobody wants to talk about.
PAPER
My list of notes is over 10 pages at this time.
Some might call this a design document, but its not. That comes
later. You should always start on paper. Paper is easy to throw
away if you decide thats not a good idea. Also, paper is easy to
cary. I have a notebook I carry everywhere. Whenever I sit down,
waiting for a bus, at dinner/lunch, no electricity (I use solar power
and have no internet access) I open my book. Add/delete/ update
notes. Play with your notes until you can't think of anything else
for your game or application to do. Also remember to devide
your notes up into a plan of attack.
The reason paper is so important is you need to have your notes
as a reference for writing your design document. So, in your notes,
you need to list how many #Include files you will need. Detail
any problems you need to deal with and describe how you will
tackle those problems.
Example:
I want the user to select from a list of maps to play
So, I need to decide how to manage that. Will it be a list
of Map names? Use map pictures (how to get map images)?
Have the user press a key (1-9)? yucky ...
Details, details details. These decisions need to be in your
notes, along with at least some idea of HOW to do it.
If doing a team project, this becomes even more important.
Because then you need to decide who does what, and need to
make lots of place holders so that these improvements
can be added when done, while still permitting work to be done
on other parts of the game. These are the kind of things I wish
to demonstrate. How to setup a placeholder.
Also, in your notes, try and come up with a plan for managing
all your variable. This may seem very simple, but when you deal
with a very large project and need to ask "What was the name
for that again?" you will get the idea. My method for this
is to sort my global variables based on usage and then declare
them in an #Include file using a Macro and then call the Macro
from the main source. This way, I can quickly jump to the
Macro definition to add more, and jumping from section to section
is very quick.
Back to Top
My Design Doc
Yet another Car Racing Game by Waffle
We will make a multiplayer car race game using only media
provided by DBC. This helps simplify project creation because
all media is free to use and distribute.
WaffleMat will be use for map creation and WaffleIDE for the
code editor. This is important because WaffleMat can export
maps in *.wmt or in *.dba format; and WaffleIDE can support
compiler directives so that from the IDE we can make custom
builds to enable the end user to edit the maps or not.
And then spruce it up a bit by adding extra decorations
and animations for Pit Crews, Emergency Crews and so on.
Features
- Permit players to select car or map to play on.
Create a dialog box displaying the map icon as an image.
If the player clicks on the image, it changes to the next
image. We will show the map name below the image. To obtain
images for the maps, the map must first be played, so we
need to be able to load a map that has no image, and then
create the image from the map and save that to use later.
We will use a *.ini file to track those changes.
For car selection, we will display available models, one
at a time, like the map information. Player can change
car color by clicking on it.
- Cars tilt on ramps and banks
Requires an extra tilt object and a little trig. no problem.
- Gages for Fuel ,RPM ,Speed ,Time
Just basic round, but support for extrernal images in case
someone offers something better. These are ghosted and placed
top of screen so they do not interfear with seeing the car.
- Map display show position on map of all cars
This is tricky. We will create a 16Bit bitmap in a memblock
and copy map information to the memblock. Then, save the memblock
as a bmp (just in case the original bmp does not exist).
This memblock gets copied to a second memblock. As cars are
updated, thier information gets added to this memblock.
Then, an image is created from this memblock and use to texture
the map object on the HUD ...
The problem with a 16Bit bmp is DBC does not support the color
format. So, we need to be able to convert it ourselves.
No problem, done that before.
- Up to 4 online players
Each player is assigned a car based on a sorted list of thier
UID. This ID is created based on the order of connection and
is unique across all users. We then store the sorted list
as a reference to LID which is used only on the current PC.
Sounds complicated, but done that before.
- Up to 9 AI players
Use WaffleMat to set up AI markers on the map. We will use 5 AI
markers (1,2,3,4,5) to ensure that AI cars go in the right direction.
The AI locates the closest marker , and then heads in the direction
of the next marker. If 5 is the nearest, then the AI car heads
in direction 1, while trying to stay on the track and avoiding
other cars. For Collision Avoiding, we can get by with simple
box collision and use a large box to help maintain distance.
The AI can use speed control to avoid impacts from behind. Each
AI will have a slightly different stratedgy and trim adjustments
that will have an overall impact on the race. Other factors will be
fuel to carry and recommended driving speed, based on estimated lap
time and overall fuel remaining for the race. Many minor things,
lets see which combination is best.
- Collision Testing
For this, we try several methods at once. With compiler directives,
we can test different methods easily. Start with DBC basic box,
then rotated box. Then do our own math and see which is fastest.
- Wrecks with effects
Lots of funny business here. First, we need to disect the DBC car
model into component parts, and make a new model. Then re-texture it.
This way, it looks exactly as before. We also need to save mesh
copies of each limb. DBC does not support this, so we copy the mesh
to a memblock, cut it up, and resave it to several more memblocks.
For wrecks, we can have the tire come off and fly around. We can even
deform the body mesh a little at a time for small wrecks.
- Ramps and Bridges and Tunnels
WaffleMat will use automapping. Grass at a height of 5. Road at 10.
Dirt at 50. Ramps will be basic plains tipped up. Bridges are simple
plains supported by two ramps. Tunnels will require a tranparent
matrix grid and an external model that ramps down and additional
models for other tunnels. Tunnel bottoms will be at -25 and width of
one tile or 32. Minor details to overcome will be getting the ramps
and bridges to line up properly. This will be just a trial and error
thing to see what works. Collision with ramps and bridges will also
be on a special case too. But should be pretty simple. Width shall
be kept at 1 tile width or 32 to keep things uniform.
- Players can customize thier cars
Support front and rear trim adjustments that affect handling
and tire wear. Players can also determine how much fuel to carry.
More fuel = more time between stops but slower accelerations
Tire wear affects time between stops and drift on track.
- Car Health Display (Optional)
Displays realtime status of car. Usefull for debugging adjustments.
- Random Damage
Flat Tires. and how they affect handling. Car slides alot.
- Track Decorations
Just extra models to place around the track. Bleachers, Pit Stops,
Flags, Pit Row ....
- Animated Pit Crew
5 guys, same color as car each with own job. Mostly as a RTS
experiment. They don't start work until player stops properly.
2 tire guys, 1 Fuel/pusher , 1 Guide/Trim/Push , 1 Jack/Push
- Animated Emergency Crew
Ambulance drives out from Pit Row to accident area and remove stuff.
Then return to pit row.
- Pit Crew Messages (From)
These are messages fro the Pit informing the Player
of various potential problems:
Lap Time - Players time for last lap
Lead Time - Time ahead or behind
Check Tires - Recomending Player return to pit for tires
Check Fuel - Recomending Player return to pit for fuel
Conserve Fuel - Recomending Player slow down accelerations
Checker Flag - Last Lap
White Flag - One more Lap
Yellow Flag - Accident, No Passing, Slow Down
Red Flag - Accident, All cars STOP
Accident Location ...
Debre Location ...
Emergency Crew Responding
- Pit Crew Messages (To)
These are messages you can send to the pit to prepare for service
Comming In - You'll enter pit next opportunity
Negative - You'll stay out
Prepare 4 tires and fuel
Prepare 2 left tires and fuel
Prepare 2 right tires and fuel
Adjust Trim Front Tighten
Adjust Trim Front Lossen
Adjust Trim Rear Tighten
Adjust Trim Rear Loosen
Prepare fuel Only
Repairs
- Online Quick Messages
These are prepared messages you can quickly send to other
online players. Also, players can add more to the list,
up to 10. (0-9) as instant messages so no need to type.
Road Hog
Move over Gramma
Reckless Driver
Oops
Go for it
May I pass?
- Custom Versions
We will use alot of compiler directives to easily turn different
features on/off from the IDE. The different directives are:
LevelInclude(1) - 0=*.wmt,1=*.dba as #Include
SaveMap(1) - for saving map icons
AutoLaunch(1) - Auto start last level skipping dialogs
ShowDirectives(1) - Display all directives used
AutoHost(1) - 0,1,2 Offline,Host,Join using last ISP$
JoinISP$(1) - overides last ISP$
KeyBoard(1) - Support different keyboard commands
0 - Default
Up/Down Arrow = Faster/Slower
Left/Right Arrow = Turn
Q = Change Camera
P = Pit Message Toggle (1-0 to send)
C = Chat Message Toggle (1-0 to send)
1 - Advanced
Up/Down Arrow = Engine RPM
Z/X = Shift Gears
Left/Right Arrow = Turn
Space = Break
Q = Change Camera
P = Pit Message Toggle (1-0 to send)
C = Chat Message Toggle (1-0 to send)
EmergencyCrew(1) - Activate Emergency Crew
NoCars(1) - Only loads 1 car for test puposes. It will also load
an extra car (no AI) for collision testing
PitCrews(1) - Activates pit crew models
ShowRoad(1) - Displays extra messages for car on road or off road
Drift(1) - Enables drifting effects based on trim and tire wear
BoxCars(1) - Displays ghosted box araound all cars
Version (1) - 0,1,2,3 In house, Demo, Full ,Editor
NoHUD(1) - Hides all gages and map
LockSyncRate(1) - Target sync rate
NoHealth(1) - Cars get no damage
NoRandom(1) - No random damage events
NoDecor(1) - No extra models (bleachers and such)
LockCamera(1) - 1,2,3 (0=changable)
DBCHits(1) - 0,1,2 Box Only, Rotated Box, Math
DisplayMode(1) - Overides Dialog and INI and uses this mode
We will need to divide this project into many modules
- Globals
This will hold all global variables for the game itself.
These will be wrapped in Macros for easy use from the main source
module or any functions that need to reset any arrays
- Main Source - Holds the main program sckeloton
- Text - For general text functions
- Media - For managing all media objects
- wmt.dba - For loading our WaffleMat Levels
- Game - For our special game functions
We hide them in the #Include to help keep the main module
looking clean.
- Effects - Tilt, Explode, Collision,
- Internet - For our online functions
- Dialog - Functions for creating our dialogs
- Each Dialog Box gets its own #Include file
- INIFile - Functions for managing INI files
We will procede from a top down perspective.
Begin by picking 3 textures for the map and blending
them together in WaffleMat and then create an autotexture
array. Then, using this, create 3 test levels.
- Basic Oval for testing simple ideas
- Figure 8 for testing collision and AI ideas
- Double 8 for testing ramps and bridges
From here we procede to first operational test.
Just simply load the level into our game and setup
the basic commands to move our car around and see
how it looks.
Next we expand the basic game to support all Directives
via CompilerIF ... and place lots of placeholders for
extra code and begin updating Globals, Media, Text
and so on as we progress.
Begin making the dialog tree. We will use text at first
just to get the sequence working right.
- Main Dialog - connects to Display, Multiplayer, Offline,
Web Site, IRC, Exit
- Display - Select display mode, then returns to Main
- Multiplayer - Connects to Main, Host, Join, IRC, Offline
- Offline - Player select car and map, connects to Main, Multiplayer,
Play
- Web Site - Closes Game and launches explorer to connect to web site
- IRC - Closes Game and launches explorer to connect to
game creators free IRC web client
- Exit - show closing splash screen and exit
- Host - Player Selects car and map and waits for other players.
connects to Multiplayer, Play (if no players join, offline is assumed)
- Join - Asks for ISP of host, showing previous ISP used. If a connection
to the host is completed, Host Dialog is displayed with some features
turned off (Map selection ). Connects to Multiplayer, Offline
- Play - Game begins with current settings and players
Note: the Host, Offline, and Join-Host dialogs are all the same, but with
different features turned off or on. Offline players can't chat, Joining
players can't change maps and so on.
That should cover the basics. Gives a pretty thorough description of what
I am trying to write and how I expect to write it. Not all problems are known
or solved, but as many are described as I can think of. Also, by using
#Include files, we can test our functions all alone in the include file
without messing up our game as we write. Another benifit of the map editor
is rapid game creation. We can have a working level in a few hours. Probably
in less time than it took me to write this Doc. But, its still a good idea
to write all this stuff out. For example, I originally thought I only needed
3 waypoints for the AI to work. But while explaining about a figure 8 track
I noticed that there was always a way for the AI to pick the wrong direction
at a crossroad. So, I needed 5 (1 more than the number of directions) to
prevent the AI from becoming confused. I think I have tranfered all of my notes
to this design document, so now we can procede to the fun part ....
Level Creation.
Back to Top
Level Creation
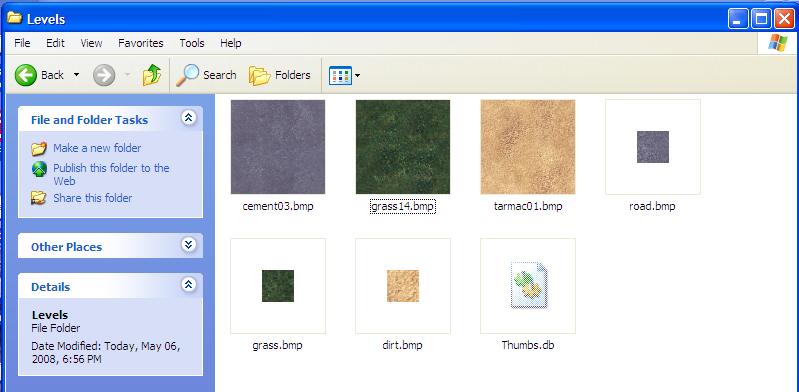
First we locate 3 textures to use. DBC provides many, but they are
256x256 which takes up alot of 3D memory. My laptop only has 8MB
so I need to be concerned about that. I capture the first 32x32 from
each texture (using MSPaint) and save them as ...
Then we start up WaffleMat and blend the 3 textures
to make an autotexture array. Since we are using road tiles,
we need to blend the tiles in a specific order.
First we select the grass texture. Next the dirt texture
and lastly the road texture. This order means grass can be used
anywhere and is blended with the dirt texture. The road
texture is not blended. Instead, road tiles are textured
with the road texture, and then dirt is used for the sides of the road.
So our tiles look like:
Now, we set up our height map by setting the height
levels for the first 3 tiles ... Grass to 5,
Dirt to 0, and Road to 10. The theory here is to have
the dirt look sorta like a ditch around the track.

Now, to do a basic oval track ...
Make a medium size world, about 50x50 tiles
and our textures are 32x32 and lets keep the world
size the same as the tiles for simplicity...
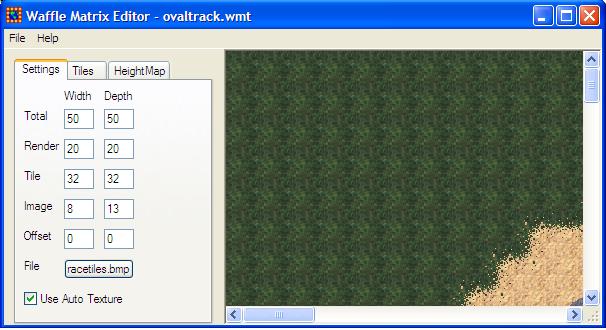
Then check the Autotexture box. WaffleMat will then
generate a full heightmap for all tiles based on our settings.
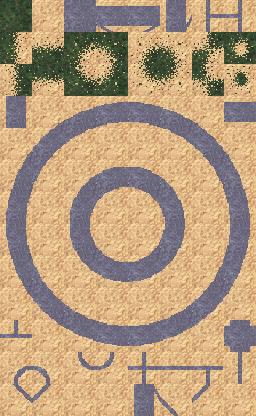
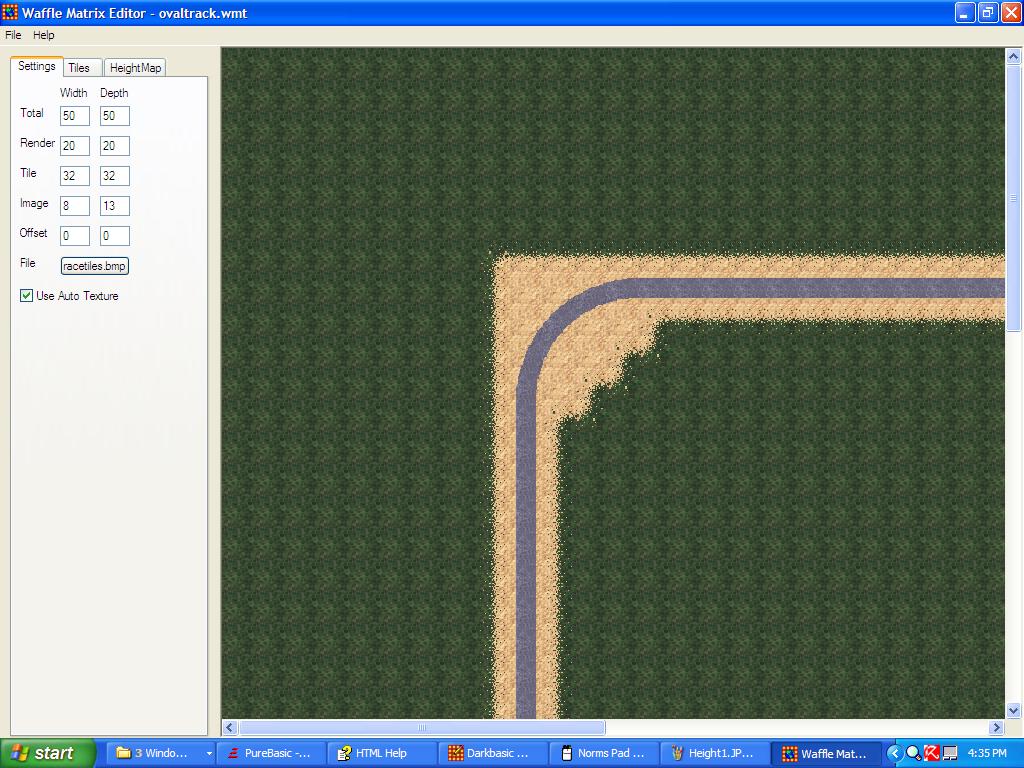
Now we simply draw our map using a road tile.
And enlarge the screen and we get something like ...
Now we add some AI markers to identify the direction
around the map. Also, found a new problem. How to mark the
pit lane and pit stops? The track AI will use markers
1-5, for the pit lane, 6 marks the start of the lane,
and marker 7 marks the "slow down" point. Players going
to fast past this point get a 1 lap penaulty.
so, 6-9 and repeat for the lane, then use marker 0 to
identify end of pit lane (Players can begin speeding as they head
towards this point).
Use letters A - J to mark actual pit stop locations,
A=Player 1, J=Player 10. K - T for car starting locations
on the track. So, we setup the overlay like so ....
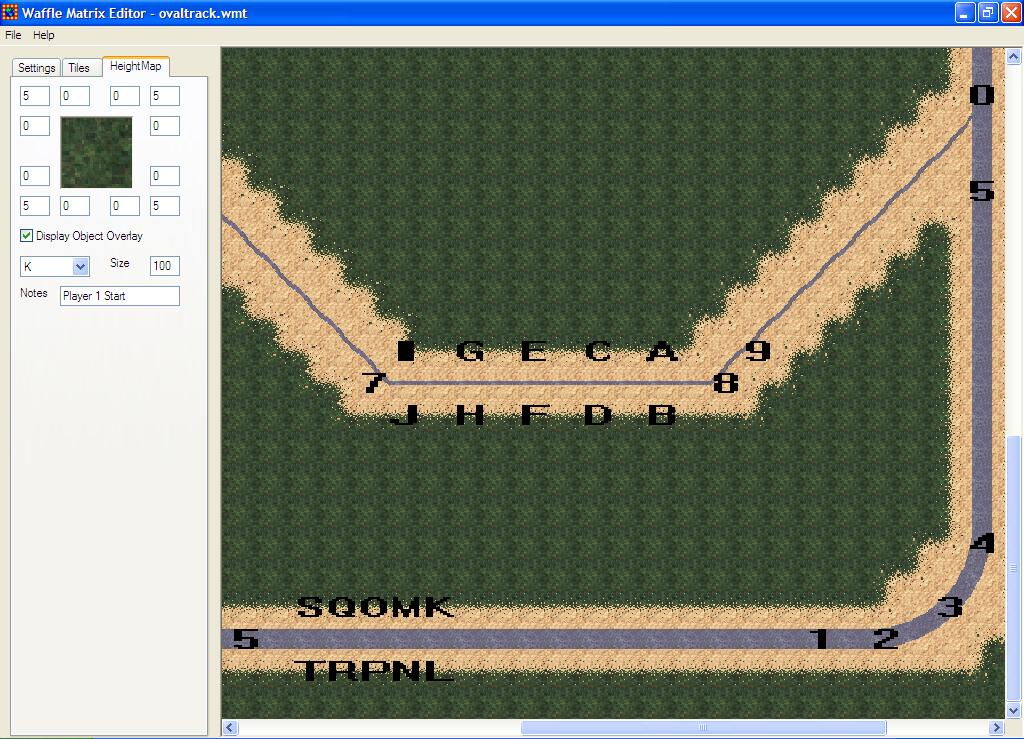
Notice the size is set to 100. This is a percentage of tile size.
So, 100= 32 pixcels in our case. We do this because only
one object per tile location is actually saved. It helps
prevent crowding. Then repeat for the other 2 levels, figure 8 and
double 8. The complicated thing here, for level design, is AI.
The is especialy complex for the double 8 track. We need to
ensure that the AI does not get comfused in decideing which AI
point to follow. So, we need to watch for two points of the same
number being close together. Not to worry too much though,
because when we test the levels, we can watch the AI and adjust
any waypoints later.
During testing, I found some problems with the AI and how the waypoints
were used. To improve precision I decided to place the waypoints into
the bitmap (texture map). This method I do not need to ensure the waypoints
are on the road, or even visible to each other. But, I will need to
modify the bitmap during loading to remove the odd colors:
Tile 35 Holds color keys
- White - Player start location
- Red - Lap start/end location
- Yellow - Main track color
- Green - Pit row color
- Cyan - Change Main color to/from Purple
- Blue - Pit row entry/exit
- Purple - Alternate color for main track
The overlay system is still in place and is used for actual pit
locations.
Back to Top
Operational Test
This is where the fun begins. This part is pretty simple too.
The #INCLUDE file Download wmat.dba
contains most of the code required to load the level, so we need
only focus on specific items such as controls, camera start, models
and other details. Since this is just an operational test
and not a full game, the code is very simplistic. And
we'll do our test using the oval track.
optest.dba
contains our operational test code. You can see I already
adjusted the size of the model and have a working
game, sorta. You can drive anywhere and the map scrolls
properly. The camera controls work as does the basic controls.
Left/Right to turn, Up/Down to move. No physics or math.
Nothing fancy, just an operational test load of a level.
This verifies that all our #Include files seem to work.
Also shows us what it looks like. I did find a few problems
with the heightmap. Because there is no transition tiles
between the road and the grass, dirt and road need to be the
same height, to look right. So, I adjusted the heightmap
to set grass at 10, dirt and road at 5. This seems to look
pretty good. I also adjusted the model to make it face properly.
But all these things are pretty simple and straight forward.
The key step here was proof of concept. Getting the roads
right, the maps right, and finding the start point.
The car still does not start on the track, but we were expecting
that. Remember we placed our markers off the track by 1 tile?
That was to have the car start on the side of the road, so the
next car could be placed next to this car. We will wait on that
for when we start placing all objects, and correctly placing
all the AI points. For now, the operational test is done.
Next we need to copy our design document into our project.
This sounds complicated, or redundant, but is very crucial.
In truth, it may be redundant, but its also very easy. Its part
of how to take a very large project and break it down into
smaller chunks that are easy to do.
The simplest way would be
to copy our design doc as commented text into the source module.
For most, that would be enough. Others may settup a to-do list
(the DBPro IDE has one with fancy check boxes). What we will do here
is a combination of the two. Lots of comments, place lots of dummy
functions and line labels, and setup all the compiler directives.
No real code, just lots of place holders for things to do.
So we set up all those compiler directives:
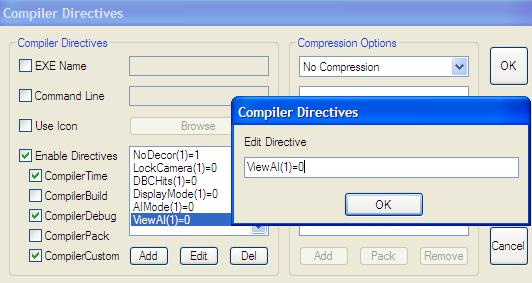
And I thought of a few extra to add in ... AIMode(1)=1
to enable all cars as AI only, so we just watch the race.
ViewAI(1)=car to show the the strategy in use for that car.
NoBank(1)=1 to turn off road banking. I'm sure you might be able
to think of a few more. This is just to get started.
Next we need to actually place the COMPILERIF .... for
each directive we wish to use. That's why I do them in the IDE
first, so I can quickly see the list at any time while
adding them into code. Adding to code then to the IDE is
much harder ... if you can't remember where in the code ..
We will also stick in our template dialogs. We will use
****DLG1() to identify this is only tempory dialog functions.
The first draft is just your basic text list option where
the player presses 1-9 for an answer in the dialog. Very basic
stuff. Later we upgrade to using a list of buttons and such.
For example, our display options.
So, a typical dialog looks like
Download typdlg.dba
or you can examine any ***DLG.dba source file and examine
the function ***DLG1() function. And our source with
the Design Doc included looks like
Download withdoc.dba.
You'll notice I added another directive; UseEscapeKey(1).
When this is turned on, a race can be terminated using the
EscapeKey and another map can be selected. If not used,
the ControlKey fills in for this purpose. I also started
codeing for the advanced keys, although not tested yet.
As you read through the code, you'll see lots of placeholders.
Much of the math will be done using trial and error,
to see what works and what does not. Same with the collision
system. I wanted to demonstrate the perfomance differences
between using math methods and using DBC methods.
Back to Top
Player Options
For me, this is the hardest area to write. Not because its is
difficult to code, but because its not fun to write. I much prefer
to delve into the math and memory management things that involve
the game instead of trying to make the game pretty looking.
So, for this part I sorta cheat and write a general dialog
system that can easily be imported into any game without any effort.
The #Include file Download DialogMan.bas
contains my general use functions for creating simple buttons based
dialogs. By Dialog I refer to a complete list of options
for a user to select from. After the user selects and option, the
dialog closes and frees up any media used by the dialog and returns
the option chosen by the user to the main program.
If you examine the typical dialog
Download typdlg.dba you'll
see it basically performs this purpose, badly perhaps, but
does the job. For home use, or among friends, this may be just fine.
But for the internet, you need something friendly that works via
a mouse. So, to start, we need to draw up some buttons and we need
a background image to use. You could use screen shots, or just
go with the basic black, or get as fancy as you like.
For my buttons, I like to use a fontsize of 20, and make the buttons
30 high and wide enough for the text, but so all buttons are the same size.
It just helps simplify the layout if everything is the same size.
So, my basic button (240x60) looks like :

And then I simply stick in the text. Use Dark Grey for disabled
options, and White for enabled. For a background image, we will
start simple with a basic black with text at the top and my logo
at the bottom. Later, we can switch to random screen shots for
variety. So, the background looks like :
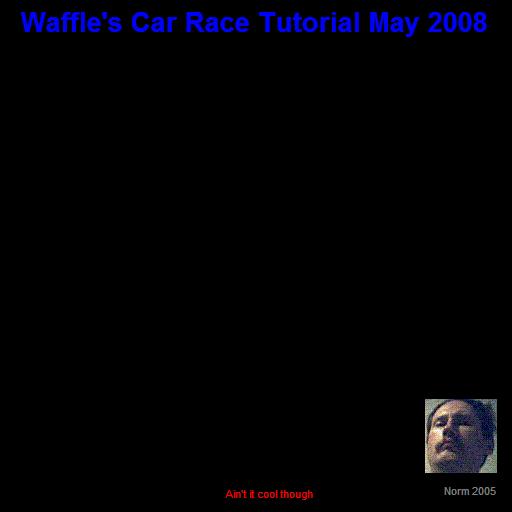
I use 512x512, even though that's sorta big, but its a power of 2
(not required for DBC, but for other DX versions it is(DBPro).
Also, 512x512 helps retain detail when the image is stretched
to fit the screen (640x480). But if you use a screen shot, then this
does not matter. There are GUI builders available, but I prefer
to use paper to get the Idea then then tinker until everything
fits. For simple dialogs, this works best. For complex ones, such
as the Game Setup dialog, the paper needs to be exact. For me,
GUI builders always seem to lack something. As I walk you through
the dialogs, you can see what works well, and what does not.
The Main dialog is very simple, and looks like:
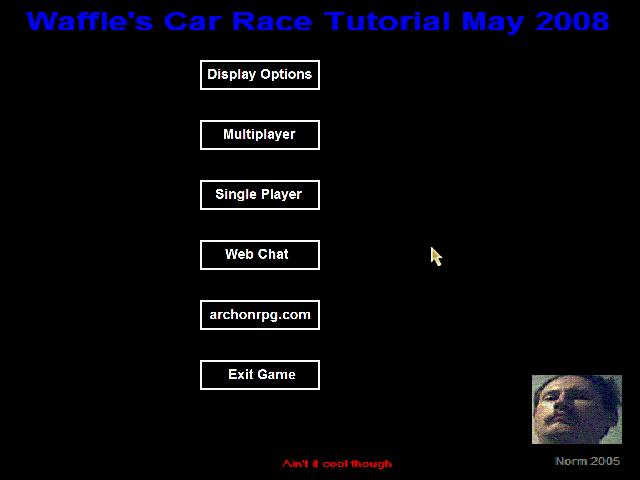
And the code is in function MainDLG2() in
Download maindlg.dba
The test for the code
is at the top. You'll notice that the required #Include(s) are
there too. My IDE (Waffle's IDE) will ensure that duplicate
#Include files are ignored. This makes it very easy to include
test code inside of the #Include file. In a large project with
lots of macro's and lots of code and so on .... build times
can become quite large. So, we need to find ways to test our code
inside the #include where the build time is smaller. Sometimes,
that's not easy to do, but it is important to learn the idea
as soon as possible.
Yes, I said I would try and say a few things
nobody else wants to talk about. Testing code snipets in an #include
file is very important and should be done often. That is how a
new programmer builds a code library. And, experienced programmers
build projects from this code library. This concept is important
to use as this is the only way you can compete in all those online
game programming compitions. The larger your library, the more generic
the code, the better your documentations, the greater your chances
at completing a project in time. Notice I say completing, not winning.
But, if you can't finish, you will not win at all. So, focus on
completion, and do not try to include too many KEWL things
or you will be doomed. Unless, all those things are already in your
library and have been tested over and over and are just waiting
for the right moment to be shown.
The Display Dialog look just like the Main Dialog, so I won't
cover that one. Only it uses 2 state buttons, to show the currently
used display mode with a blue background.
The next one is more complex. We need a Join
dialog that needs to accept user text for an internet address and
player name.
It still need a few buttons before proceding, but thats about it.
Its more complex, but not that much more. We just set the background
sprite to transparent, and use our A$=GetChar$(A$) function from
the Text.BAS module and done. One minor problem ... Setting the sprite
to transparent cause DBC to change the backdrop color, so we need
to reset it to black again.

And the code is in function JoinDLG2() in
Download hosttest.dba
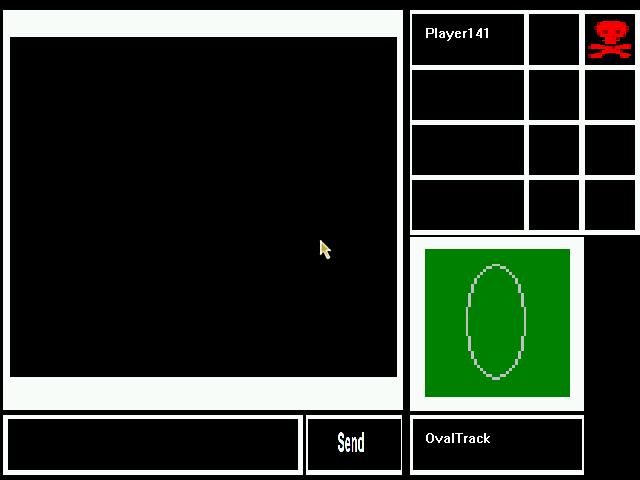
Our final dialog is more complex. Its the game setup dialog.
This one gets pretty fancy because its used during multiplayer
as well as single player. So it needs to support internet
chat, player colors for the car, and map selection.
After drawing all our buttons, we need a silly place holder
for our map selections. It looks very very silly, just some
hand drawn lines using MSPaint, but conveys the point. Later
we will have some much better images. For now, this is fine.
The completed dialog looks like
In case you were wondering how I did the layout, I roughed
it (Just guessed where they go) and then called the
AdjustDialog() function instead of the usual DialogMouse()
function in the
Download DialogMan.bas
module. This function (hide the mouse before using) will
permit you to move and resize the buttons (see docs inside function)
and provide the actual location and size of the buttons.
Then, I write them on paper to re-enter into the code.
The full code is in function MapDLG2() in
Download maptest.dba
Thats it for our dialogs. We still need to hook them up,
but thats for later. For now, we just want the interface working.
Next we will add our multiplayer code and while doing that, we
will finish up adding the remaining code to the interface.
During testing, I found a DBC bug that results in a GPF during
run time. If a matrix is loaded, then deleted, and you then try
to change display settings, BOINK GPF crash. So in the Setup()
macro I added a variable "BlockDisplay" and set this to a 1 if
any level gets loaded. Then call MainDLG2(BlockDisplay) to
enable/disable the change display mode button. There is always
something. If you should incounter any odd errors, try and duplicate
them in a seperate code module. Its amazing what you learn when
trying to duplicate a strange error.
Back to Top
Multiplayer
Many try to do this part last, and have many many problems. We will do this
first !! Its much easier to take a multiplayer game and play it as
single player, than take a single player game and make it multiplayer.
The most common problem is not the code for creating a game,
but rather trying to get the correct data sent and received at the
correct time. If you code as single player first, the problem becomes
compounded by:
- Managing Chat Messages
We bypass this by testing it inside our dialogs.
And by setting up quick chat text list that are sent in one keypress.
Its very hard to drive a car while typing.
- Syncronizing Game Start
Although I have not set up a waiting room yet, we can use the
actual game map for that purpose and simply add starting lights
to show player readiness. Each PC will lag the host by up to
1 second because of internet lag. And, there may be other delays caused
by PCs running at different speeds. So, all must wait until all
PCs have finished loading the selected level.
- Syncronizing Level Selection
We managed that inside our dialogs. The HOST selects the maps.
Player colors and car selections gets determined by the order
that players join the game. The HOST initiates the game start,
after all players have identified as ready. This then locks the
game so no new players can join. After a Game Start command from the
HOST, all PCs load the level selected by the HOST. And then wait
until all PCs have stated that the level is loaded. Then, the
count-down timer starts and then the race begins.
- Player Selection
we determine that by sorting the list of player UID which is a value
that is unique accrossed all PCs. Each PC has its own unique ID.
This sorted list determines car assignments and color.
- Information To Send/Receive
By organizing our variables well, the data thats important is
easy to find. Not all data is important, so we need to be a bit
more selective. Also, we do not want to send data every sync.
That would kill the network. Instead, we send at regular intervals,
about every 100msec. AI works on its own and can be ignored(mostly).
Collision are managed by each PC and if it invloves an AI the
PLAYER must inform all for the update.
- Updating AI units
Since each PC runs at different speeds, the AI can become out of
sync on each PC. We shall try and fix that by having each PLAYER
update some of the AI. Because the AI is mostly ignored,
we need only update a different AI each update. If 2 players,
each player updates 4, if 3 players, each updates 3 and so on.
Since each update is 0.1 sec (100msec) it will take 0.4 sec to
update all AI. That should be fine because of how the AI works.
This update is mainly to resync the AI. Also, to assist, we can
even modify the default speed on each PC to keep the sync position
closer to the estimated position.
As you can see, there are many concerns to worry about. But, most
can be handled easily. The main intent here is to get things mostly
working so we can focus directly on actual game play later. Also,
by focusing on multiplayer first, we build up our code library
so that in later projects, as many problems as possible
have already been solved.
And be sure to check out the message loop MapMessage() in mapdlg.dba.
This is used to manage all data while inside this dialog.
Once the game has begun, this function needs to be copied
to the main program for extra costomizations. A version
is kept with the dialog just because it could be reused
in another project with very few changes. Remember,
Always try to write reusable code!
Now that we can setup a game, we need to load the
players. Again, we will keep things simple and leave
the special things for later. So, we need to revisit
our
Download withdoc.dba to see LoadCar() Macro
to add in AI/Multiplayer things
to identify the PLAYER using the car, and the PC that
shall be controlling the AI for the car. If playing
offline, this PC controls the car and all cars except
player 1 (unles in AI mode) are AI cars. Or owned by
player 0.
Then add in a message loop to LetsPlay() and we should
have a working multiplayer game that supports up to
4 players and does map seletions. Sure, it still needs
alot of work, but this gives us something fun to play with
while we work. You'll notice the message loop looks alot
like the one from the MapDLG. Thats because it was simply
copied, and then edited to remove the dialog references,
and to add in extra code for moving objects. We have barely
scratched the surface on multiplayer stuff, but this covers the basics.
We still need to compensate for lag times, but thats
for when we a ready to fine-tune the game. Its really
too early for that kind of adjusting. The priority here
is to get it working. Then, add our required
features, and then tweak it for anomalies. Anomalies
are not always bug, but rather a feature that does
not work as desired.
And lastly, add a waiting screen to the end of the
PlayLevel() function before it calls the LetsPlay()
function. This just locks up the game until all players are
ready. And then starts a count-down to start the race.
Again, nothing too fancy. Most of the code is in the
Download mapdlg.dba to see PauseGameStart()
function. It just uses text to clearly state the status
of each player. After all players have completed the
PlayLevel() function, the game starts automatically.
So, we added a 5 second delay after the PauseGameStart()
function for players to get fully ready to race.
And we need to copy the car/map placement code from LetsPlay()
to just before our PauseGameStart() to get the car
actually on the map. Now we are done with multiplayer,
except for the tweaking we will do later.
Back to Top
Math Problems
Now that we have a working game, we can start making it better.
Lets start by ensuring the camera stays above the map to hide
those wierd clippings when hills get too close. I'll do that by
moving the camera 10 back from the car, and up 5. This gives a 30
degree down angle for the view. Now we just point the camera at the car.
While we are at it, lets shift the car up by 0.1 so its not stuck
in the matrix.
Next up lets add some pitch and roll. This gets a little wierd,
but we can hide all the wierd stuff so we don't need to deal
too much with it. All that wierd stuff is in the
Download objectmacros.bas to see TiltObject()
macro. All we need to is change the
Download carrace.dba to see LoadCar() macro
to add in a tilt object to the car. And then when we update
the cars position, we just call the macro to do the dirty work.
Notice how the car starts far away from the road. Lets fix that.
When we detect the marker, we need to locate the intended road.
And then place the car on the side of the road. To do this, we can
sorta cheat. Remember, odd players are on one side, while even
on the other? So, the road center will always be at the mid-point.
Thats a simple math equation using the average of two points
to obtain the center point. Also, we need to shift our markers by
1/2 our tile size to re-center our markers on the tile. This error
was caused by our setting the object size to 100% to limit only
one object per tile in Waffle Matrix Editor. It does simplify
level loading, because if we load the level using the #Include
method, we get the same error. So, we add 1/2 to X# and subtract
1/2 from Z#. Not sure why the difference, but from trial and error,
this seems to work.
Now, set the NoCars(1) Compiler directive to 0 to show all cars.
Verify all are on the road. Now, we are ready to begin collision
testing. The cars don't move yet (No AI) so its easy to test ideas.
Since we are crazzy, and want to compare different collision methods
for performance; lets start with DBC rotated box colision for the cars.
No other objects get collision testing. The pitcrew and other such
things are handled in a different manor. This method seems fine, for now,
but lets see what happens when we load all objects in and start checking
collision data between many cars....
You'll notice that I used DBC for Compiler Directive DBCHits(1)=1,2,3
and Sphere for DBCHits(1)=4. Here is what I learned from this test:
Collision Testing: DBCHits(1)=
- 1 = Player Car Only
Very fast and stable. Nice and simple to work with.
- 2 = All Cars tested against All Cars
Gets a little laggy at times (mostly during testing)
if there are many collisions at once. During testing the
source of the lag seems to be the mesh commands themselves.
This could be caused by the mesh being changed during real time.
- 3 = Different car each sync
Really sucks hard. Fewer problems with FPS, but the
issue here is that collisions are not always detected.
- 4 = Using sphere (cylinder actually) math
Not fully tested. I mainly used this to identify the source of
lagging as the mesh commands. By ensuring object get moved
outside of the collision areas, the lagging effects were much
reduced.
The lesson here, always be prepared to experiment.
Next, lets fix-up the cars a bit. Sure, we could just re-color the limb
that is the main body, but that's just too easy. Also, we may want exploding
cars and other effects later. We could try loading the .X object into
our favorite modeler (Milkshape for me) but thats violates our design doc.
Remember, this is a tutorial, the premis was to use only what's available
out of the box, plus Waffle's IDE. DBPro has a "MAKE MESH FROM LIMB"
command, that DBC is lacking. So, lets make one and then take our car
and break it up into separate objects, and then remake the car.
This seems kinda silly, but its the best way to show what you can do
with what you have. Also shows many other tricks. As a benifit, you can
have the cars wheels fall off, bounce, whatever. Also, we want to do
some mesh deformation to the main body as the car takes damage. The technic
shown here is too slow for actual animation (although it is possible)
but is something fun to play with if you have time.
So, we call up Waffle Viewer and then examine the limbs.
we get:
- 1 = Whole Object
- 2 = Front Wheels (left and right)
- 3 = Rear Wheels (Left and Right)
- 4 = All four struts
- 5 = The Body
We need to divide up this into
- 2 = Front Left Wheel
- 3 = Front Right Wheel
- 4 = Rear Left Wheel
- 5 = Rear Right Wheel
- 6 = All 4 Struts
- 7 = Body
And soo, we add a special function RebuildCar(ID) to solve this.
Now, for a flat tire, we can either lower or hide the respective
limb. Also makes a pit stop for a tire change look better. And, for
a crash, we can make each wheel fly about randomly.
Since this is supposed to be a tutorial, I need to talk about some things.
The reason for all the placeholders is to provide a basic structure
to our game. And, to try and keep our code a clean as possible. You'll
notice the dialog loop is pretty clean and straight forward. All the complex
stuff is hidden in the respective #Include file. In our original design doc,
we were supposed to create an #Include file for our game functions.
For simplicity (so I don't need to rebuild the #Include files every time)
I am deviating from the doc. I am also deviating by not testing multiple
collision methods (at this time). The DBC method seems pretty resonsive with only
10 objects to check.
For complete beginners, this tutorial may seem very complex. But, you
can easily modify various areas and even use the level editor to make
your own maps. As you delve into the code; the key areas are PlayLevel()
and LetsPLay() functions. The things to learn here are Functions, Globals,
Macros and Select - Case. And also CompilerIF ..... You'll see how I tryied
to keep the event loop (What happens when you press a key) clean and
simple. Sometimes that is not possible. If you check out the PlayLevel()
function you'll see that I use the LoadCar() macro to keep things simple.
But I failed to do that with Player 1 car. Technicaly, that was a mistake
on my part.
During initial developement, all we had to do was Load a Car and show it.
As more features were added, this got more complex. Then, we were ready
for the other cars, I copied player 1 code to the macro and then trimmed
out code not required. Another factor was Player 1 is used as a reference
point for all the other cars. Therefore it required special code. I mention
this here to show that although some code looks complex, many times its just
poorly written. The other extream is the MakeMeshFromLimb() function in the
MediaFunctions module.
More advanced users may wish to examine that function. Its very messy, but thats
mostly because of how I chose the solve the problem. To make a mesh from a limb
required
- Offset selected limb by 1000
- make mesh from object
- make memblock from mesh
- copy memblock to arrays
- delete not required vertexes
- copy arrays to memblock
- make mesh from memblock
- restore the original limb position
- return the new Mesh ID
and so, that function got pretty messy. But shows what we can do if we
don't mind getting very dirty and doing a wee bit of reading. And don't
mind if the docs are not exactly clear (In the help files it states
that face data is 2 bytes, stored as a DWORD , so, is that a WORD or DWORD?)
It took some trial error to find out. Hows that for a little trick
for the more advanced users to check out? I said I would hide a few
things here and there for you. Also, check out the SaveMesh() function
too. I used that to make a mesh from each limb, and to divide up the
wheels into 1 each, and save each limb as its own *.x object. whewww!
A wee bit of work on that.
But, now when our cars crash, we can copy the body mesh into a memblock,
shift the vertexes around to show damage, and then use the new mesh
for the body. A bit slow work to do often, but we can manage our time
by skipping all the other math items during that update. See the
WreckCar() function for details.
Also found a few more bugs with DBC? or maybe my PC? Either way its was
fun to try and work around them. The problem had to do with how DBC
manages memory. Sometimes using my MakeMeshFromLimb function I would
get a "Severe Exception" error. It would work fine when I used lots
of delays or break statements, but die in my main project. So, my
work around was to save the meshes as *.x objects and simply load
these meshes into the main project. Yes, you need to expect things
like that with DBC and even DBPro from time to time. It goes with
the job. Just accept it. If you can duplicate the error, then you
can learn to work around the error. That's when the fun begins.
Don't just give up .... Step up. Lee Bamber has dropped support for
DBC because DBPro is better in some ways. But for older PCs, DBC
is still the best thing going .... bugs and all.
Lets make our cars drift a wee bit when sliding. See the Drift(1)
compiler directive for the full example. In short, we calculate the
ammount of "lateral" movemement our car makes during a "regular"
move. Then we simply add a "factor" to this to get a sorta drift.
The full math is rather complex (requires computing multiple directions
of movement) so I took a few shortcuts. I compute slipping as a
rate of turning. That required changing the method of turning.
Instead of:
if LEFT KEY() then AY#=AY#-1
we have
if LEFT KEY() then Turning#=Turning#-1
and then later in code we update AY# by
AY#=AY#+Turning#
This is redundant, but simplifies the slipping code because I
simply use COS(Turning#)*Factor*Speed# to determine slipping
distance per update. Its not perfect or even accurate, but it
does produce some interesting effects that are predictable.
Perfect math is nice, but slower. Another example of an optimizing
method. And we take front/rear trim and use that to modify what
happens when the car slips. Again, not truely accurate, but fun.
Now, to give each car its own unique color.
This could be done by using the color limb function, but
thats too easy. Also, that would create a 256x256 texture
that's only one color, and that consumes alot of 3D memory
and I like to keep that under control. So, we will do a
bunch of 4x4 textures. See the PaintCar() function.
That is a slight deviation from our design doc. The original plan
called for permitting players to change the colors of the cars.
But, that gets hard to manage (like if two cars want the same color)
so I went with changing the colors based on player UID (order
that players entered the game). Just thought to point out that even
if you have a design doc, and even though you should try and follow
it, sometimes, you need to change something because of an unforseen
problem.
Only one last complex thing to do before proceding on. We need a
way to detect if we are on the road or not. We'll do this by
making a memblock of the matrix texture and then examine the
colors in the memblock. This method is very fast since we do
not need to use the slow DBC bitmap commands. See the OnRoad()
function. Now we are ready to procede to AI and make this a
functional game.
Back to Top
Gages
So we are ready to get rid of our Text based Gages
and move onto something much nicer. In my helicopter game
"Pilot" or "Raid on Bungling Bay" I made the gages using
MilkShape3D. But, we can do the same thing (almost) and much
simpler using code and MSPaint. We will just do a basic blue
background with a few markers. So, make a round blue dot,
set the outside to black (for transparency) and do some white
lines from the center for the markers. Done. It looks like...

Then, we just stick a basic arrow on it and thats our basic gage.
We will use this for RPM and Speed/Fuel. And ghost it so it looks
less tacky on the screen. The code for this is just
Make Object Plane ....
Texture Object .... for our background
Make Object Triangle ... for our pointers
so, nothing overly complex. We just set the sizes to 1x1 to
make adjusting easy. Then, using the CLI (pressing the Escape
key during execution) we can try adjusting the gages until we
are happy with them. Its just trial and error.
Then, to make things extra fancy, I added a detecter for the G
keypress to shift the gages to the top or bottom of the display.
This lets the player shift the gages around based on how the player
likes it. Cool eh? And not too complicated.
Back to Top
Map display
Lets provide an overview of where the player is on the map.
The complex stuff is hidden in the functions MakeMap() and
CopyCars(). Lets start at the _MakeHUD: marker in the source.
Here, all we need do is reserve space for 2 memblocks and the
texture image for our Map display "Gage_Map(0)". The image we
use is 128x128. Add the header of 12 bytes and the total size
is 128*128*PBytes(1) + 12. PBytes(1) is set when we read the
image used for texturing the matrix. It will either be set to 2
or to 4. 2 means 2 bytes per pixcel (WORD) or 4 means 4 bytes per
pixcel (DWORD). This is determined by BBytes(1) where it will
be set to 16 (16 bits, 2 bytes) or 24 (24 bits). Then we just call
the MakeMap(),CopyCars() functions and texture the Gage_Map(0).
Thats all the complex stuff at this label.
At the _MapSync: Label, we do a few more things. We use a MapSync
variable to step through the map update. This is to reduce the system
stress (frame rate) by doing each thing on a different sync.
Nothing overly complex. On Sync 1, we just
Copy Memblock Gage_Map(1),Gage_Map(2)
to copy the source map memblock
Gage_Map(1) to the copy map Gage_Map(2).
On sync 2, we call CopyCars() to add cars to the Gage_Map(2).
On sync 3,
we delete the image Gage_Map(3). Otherwise, the make image will fail.
On sync 4 we
Make Image From Memblock Gage_Map(3),Gage_Map(2)
and finally on sync 5 we
Texture Object Gage_Map(0),Gage_Map(3).
MapSync=0
As you look at the MakeMap() function, you'll notice it does some
odd things. Rather than scan the entire map for colors, we only go by
the waypoints and just color them. The strangest thing is the Map_Color()
and the Map_Car() arrays. Tile 35 in the image used for the matrix has
our color key. Do to bad planning, these colors are not in the same order
as the cars. The cars are in Quick-Basic color order. The Map_Color()
is in a convient order, and was used for detecting waypoints. But,
we need a way to color the cars quickly, if the image format is in 16bit
format. DBC only directly supports 24bit. So, I save the color values
used in tile 35 to the map_Color array. But, this needs to be used for
cars .... So, I manually convert the order. But, the problem is Car 8
is Black, and Black is tranparent. Ooops. Thats why the
Map_Car(0)=Map_Color(2)/8
That just makes a dark color, but not black.
The CopyCars() function works much the same way. We only need to
update cars and use the Map_Car() array to color the cars.
Nothing too fancy. Try not to let concepts such as memblocks
scare you. Think of them as something new to learn. Much faster
than bitmap access.
Now that we have a map display, we need to save the map image
for use with our Map Dialog (remember way back there?). This is where
we use our SaveMap(1) compiler directive. To make it look
better, we copy Gage_Map(1) to Gage_Map(2) and then add color to all
black areas (Green) and there is our map icon display for the Map Dialog.
We just need to test out each Level and then turn off the directive.
Back to Top
AI, or Making the cars race
After spending about 2 weeks working on getting the waypoint
system working by using WaffleMat to place the waypoints and then
to adjust them with code and so forth, I found some serious errors
kept popping up. I could get everything working on one map, only to
have the AI get lost on the next map. What seems to be happening
is the waypoints sometimes are out of order so the AI can't turn
fast enough to get to the waypoint, at current speed. So I shall
place the markers into the tiles as color spots and then remove
them after the level is loaded. This will let me place the waypoints
pixcel perfect and fully automate level creation.
Lets make this a fully functional game. All we really need to do
is make the cars follow the waypoints we placed on the map.
Sounds pretty easy, but we have some minor things to do first.
So, lets break down the things we need to do to get the AI working.
- Copy the markers
this seems redundant, and it is. But, we need to have the markers
copied into a waypoint array (1 to 999?) in a simplified system.
- Ensure all markers on centered on the road
this is a we bit of work, but that is mostly done using our onroad()
function along with the MeasureRoad() function.
This is also to ensure the AI cars don't leave the road. More details
can be found in the CenterWP() function.
- Add extra information to the waypoints
Each waypoint needs to point to the next waypoint (they are not in order)
and also to the previous waypoint. Also, we need to store the original
value (ID) of the waypoint. To identify special markers (Pit Entry)
we also need an alternate waypoint option for each waypoint. The full
settings can be seen in the
Download globals.dba module.
- Test for Errors
Nobodies perfect. There may be errors in the level. See the
TestWaypoints() function to see how we test them. This is were
we check if a waypoint is visible to the next waypoint. If not,
we add an extra and place it between existing waypoints and change
the prev/next pointers to the new waypoint. Then, retest for more
errors. Also, add extra data to waypoint structure for distance to
next waypoint, angle to next waypoint, recommended speed (percent).
Recommended speed is the hardest to do. So we do that last.
The easy speeds to do are for Pit Row. 30% for the max, and car
must stop at the pit. On straight lines, 100% or some value between
the recommended speed of the next and 100 to give time to change
speeds. For turns, the greater the angle, the slower the speed,
the closer the distance, also the slower the speed. We just need
to play with it and see what works. Also, if the turn is banked,
we can go faster. Also, this is only a recomendation. Each car
has a random margin of safety. Speeds above the recommendations
should cause slipping and tire wear. This may not result in crashes,
but will result in pit stops. Also, each car will use a random fuel
value. Lower fuel = faster car accelerations, but more stops and
more tire wear. A lower margin of safety = faster car with fewer
pit stops .... Again, just overal strategy ideas, to make each car
unique.
- Make Cars Go
After all that, this is pretty simple. Since all they need to is follow
the waypoints. BUT!! they need to use the same controls as the player,
AND they need to avoid each other and the player. AND!!! they need
some kind of overall stradegy. Just going fast at all times is not enough.
If cars go too fast, they should slide in the corners. Also, if the tires
are too old, they should pop or slide more. Soooo the AI needs to make
pit stops from time to time. But, for now, we just make them go.
During testing, we can view the waypoints by using the ViewAI(1) compiler
directive. We will place a cone at the waypoint and place numbers about it.
At first I markered all waypoints, but that was too much information.
I trimmed it out to simulate AI conditions. Only the next waypoint and the
alternate waypoint will be displayed. The top number is the original ID
of the waypoint (from the map editor) followed by the waypoint number,
next waypoint,previous waypoint,alternate waypoint. How the waypoint gets changed
can be seen in the UpdateAI() function.
In the UpdateAI() function, we also manage collision avoidance for the AI.
The methode is not perfect. Sometimes a car slips and that can still cause
an accident. The avoidance methode is really just a car lane assignment. Each
AI car is assigned a lane for each waypoint. As long as each car is in it's
own lane, accidents can be avoided. If two cars try to stay in the same
lane, the second car to a waypoint will change lanes. Players can change
lanes at any time, and players are ignored as far as lane assignments are
concerned. Generally, players can drive faster and much more recklessly
than the AI, so the burden of accident prevention for players, falls on
players instead of the AI. Too many slight hits will cause a flat tire
and that will reduce the maximum speed until a pit stop is done.
Also, you can see how the
onroad() and UpdateAI() functions interact with each other in the main loop.
If you are not getting closer to the expected waypoint, the game assumes
you are going the wrong way. This will also flash if you pass the
Pit Exit marker when the marker has been flagged. Currently, it flags
automatically, but later it will be flagged by the pit crew messages.
If you are offroad for over 20 seconds (maybe lost?) the wrong way turns off.
It will remain off until you are on the road again, and then will look
for the closest marker near to player. They may be a lag before a valid
waypoint is found, but that should be OK.
Also, I set up the wrong way
flag for 5 seconds. So, if going the wrong way over 5 seconds, a new marker
is found, and the timer resets for another 5 seconds. This way,
if you take a corner very short, you may miss a marker and thus the wrong
way flag turns on. But, if you continue, it will turn off as a new marker is
found ahead of you. Not perfect, but seems reasonable. You can experiment
with setting this to a smaller value, but I feel that searching for
a close by waypoint should be avoided to reduce game lags later. This
shows a method of trading game performance for game feature....
Pit stops are special waypoints. We need to add extra waypoints to manage
these. I added extra data to the globals module just so each player has
a quick refrence to the new markers. They are just like regular waypoints,
but not all players need to use them. So, each pit stop gets an entry and
exit marker in addition to the actual pit stop marker. When an AI reaches
the Pit Entry marker, the Player_Stopping flag get set. This will cause
the car's speed to drop to 0 until the pit-stop time has elapsed. Then this
flag is cleared and the car may proceed to the exit marker.
Back to Top
Damage
Car Damage Effects
Most things here have already been explained elsewhere, but this is
a good place to consolidate alot of things.
These Effects Are Used:
- Collision
This effect is simply to detect and move cars apart.
Its explained more fullyhere
- Slipping
This checks if a car is changing speeds faster than
the cars Traction# value or if a car is turning too fast
- Spinning
This rotates the car as if it was turning. This happens
if a car is slipping. The ammount and direction of spinning
is based on the PlayerCar_FrontTrim() and _RearTrim()
settings which are customizable and can be saved between races.
Players can adjust these setting during
pit
stops.
- Drifting
This moves a car sideways if a car is slipping. The ammount
depends on speed, and the direction is based on turning speed.
Its more seehere
- Mesh Shifting
This moves individual vertexes around based on a collision.
Its more fully explainedhere
- Flat Tires
If a tire goes flat, _Traction#(Car,Tire)<0 then the _Traction#(Car,0)
gets set to 0. This will then trigger a Slipping action.
Also, this will creat a breaking (slowing) action if
_Gear(Car)>3 as a way to limit maximum speed during a flat.
Also, the bad tire will be lowered (Offset Limb .... )
by 0.5 until the tire gets repaired during a pit stop.
Back to Top
Pit Crew Messages
And also quick chat messeges.
Both messages, although for different purposes, are selected in a simular
way. Control - P (Ctrl-P) or (Ctrl-C) for quick Pit or Chat messeges.
The initial Ctrl-P (Ctrl_C) causes all quick messeges to be listed. When
a selection (1-9) is made, the messege is sent and the list gets closed.
The list also gets closed if 0 or Ctrl-P (Ctrl-C) or Tab is pressed.
Tab is used to toggle full chat messeges. Enter or Tab will close a
chat window and send the messege.
The first problem is we are already using the control key as a substitute
for the escape key during testing. So, we modify that to use Control-E
to exit a level.
Pit Messege Requests:
- 1 - Cancel Pit Stop
- 2 - Change Left Side Tires
- 3 - Change Right Side Tires
- 4 - Change All Tires and Refuel
- 5 - Tighten Rear Suspension
- 6 - Loosen Rear Suspension
- 7 - Tighten Front Suspension
- 8 - Loosen Front Suspension
- 9 - ReFuel
- 0 - Close Requests
Quick Chat Messages:
- 1 - Road Hog
- 2 - Move over Gramma
- 3 - Reckless Driver
- 4 - Oops
- 5 - Go for it
- 6 - May I pass?
- 7 - Fix your car!!
- 8 - You broke my car!!!
- 9 - Hitting the pit
- 0 - Close Quick Chat
For standard chat, we place a marker (>) on the left
and another marker (<) that flashes at the end of the chat.
For reading chat strings, we use the GetChar$() function.
So the code looks something like
ShowChat(50,50,25)
ChatMSG$=GetChar$(ChatMSG$)
if Blink
text 0,300,">"+ChatMSG$+"<"
else
text 0,300,">"+ChatMSG$
endif
if right$(ChatMSG$,1)="*"
ChatMSG$=left$(ChatMSG$,len(ChatMSG$)-1)
SendChat(ChatMSG$,10)
endif
We used "10" with SendChat because for our messege IDs
we used 10 to indicate a chat messege memblock in the function
GameMSG() where we check for any incoming game messeges.
But, Pit Messeges should be two way. So, lets add some detectors
to see if anything needs fixing on the car. In the
Download Globals.dba
module, we add
Dim Repair_Flag(9)
Dim Repair_Name$(9)
Dim Repair_Time(9)
If PlayerCar_Traction#(MyCar,Tire)<2
Repair_Time(Tire)=1
endif
and that will trigger an
AddChat(Repair_Name$(Tire),...
which will then display the messege from the pit crew.
Now add an extra check for
if PlayerCar_Fuel#(MyCar)<10
Repair_Time(9)=1
endif
and all done.
Repair_Time() is checked against the current time
and against Repair_Flag()
determine if a message (AddChat) is triggerred.
Repair_Flag() gets set based on messeges to the pit crew.
Repair_Time() gets set based on messages from the crew.
Repair_Name$() is set in the globals module and is the actual
message to be displayed either in the chat or as a flag.
Back to Top
In Game Help
I always forget this until last. Sure, most say this should be first,
but I'm pretty lazy. My thinking is, if I do this last, then the help
text is direct, and not subject to lots of revisions. Others say do it
first and design your game to comply with the help docs. How you do it
is up to you. I kept mine very simple: when the race starts, press F1
and lots of useless information will appear. I say useless, but, hey,
it does tell the player what keys do what. But scince this is a tutorial,
the information is not 100% usefull. One methode would be to add help
to your dialogs. That is the best way. Really. I did not do it that
way at this time to show the mistake. If I designed the help text first,
I would have remembered to reserve a dialog button for the text display.
I forgot. And, I'm too lazy to fix it. Instead, I added a one line
help text to the main dialog instructing players to press F1 during a game
for more helpfull information. Very yucky.
OK, lots more to do, but I decided drop this project here. It is fully
playable. Nearly all directives are working. Its fully documented and very
easy to edit or to create custom maps. I think thats prety good for a tutorial.
The Ingame Help States:
Welcome to Waffle's Car Race
Press Up/Down Arrows for Faster/Slower
Press Left/Right Arrows to turn
Press SpaceBar for breaking
Z/X to shift gears Down/Up.
     RPM over 50% to shift up
Q to change camera position
G to shift gage location
Control - P   to toggle Pit Messeges
Control - C   to toggle quick chat messages
Tab key toggles standard chat
F1 displays the very fancy help window
This program must be provided for free to all
If you paid for this then email mycat98501@yahoo.com
Visit www.archonrpg.com for more free stuff
Back to Top
Packing Options
Here is some more information nobody wants to talk about.
You have finished your masterpiece, and you want to share it
with the world. There are lots of options, but all have there
own targeted end user (Players).
Before you pick a distribution
methode, first create a testing area. If when you build your game,
you only use relative paths, things are somewhat easier to manage.
Just make a temp directory (Folder) and move your builds there.
Each build in its own test folder. Then, test to ensure the build
needs nothing other than what you provide to the folder. Some builds
will require very little (Make Final EXE with media) while others
will require lots (Source only builds).
We will basically only worry about 2 build types: Project Builds and
Full EXE builds. Each has a different target.
- Project - For those wishing to view source
All Source Code
Test *.EXE without media
All Media
Level Files
Instructions
- Final Build - For those wishing to play only
Full *.EXE with media
Level Files
Instructions
Instructions are usually in the form "ReadMe.TXT".
And just provide an overview of how to test or play the game
and any special requirements for the game. Any special credits.
Also, the Final Build folder will need a dummy *.dba file for
storing compiler directives (*.dir) for the compression stuff.
For simplicity, you could just copy the FullSource.dba file
to the folder for your builds, but that is not really needed
because all the compiler directives are internal to the *exe
which you do not need to re-build, but only to compress.
And, its only the compression options we need to save.
So,
The steps are:
- Make Folder For Project
- Build Standard EXE
Without media.
- Copy Files
CarRace.EXE
and all media
Levels
All Source
- Then test to see if thats everything
- Then create "dummy.dba"
this will store compression information for this folder.
- Open "Dummy.dba"
and select all files in Folder except for the unwanted
files such as "Dummy.dba" and "Dummy.dir".
- Press the Compress Now button
This will make a self-extracting "PCarRace*.exe"
in this folder for easy distribution of all source
information to those that wish to view it.
- Make Folder For Final Build
- Build Final EXE
With media.
- Copy Files
CarRace.EXE
Levels
- Then test to see if thats everything
- Then create "dummy.dba"
this will store compression information for this folder.
- Open "Dummy.dba"
and select all files in Folder except for the unwanted
files such as "Dummy.dba" and "Dummy.dir".
- Press the Compress Now button
This will make a self-extracting "PCarRace*.exe"
in this folder for easy distribution of all source
information to those that wish to view it.
The important things here to remember are to test
in a different folder and see if it works. Only then, do you
pack it. Sure, for a simple project, we could have just
packed it from within the main folder, but our CarRace
game is rather complex and is being distributed in
multiple formats. If you chose to use *.zip format,
follow the same steps, except for the final packing step
would be using your ZIP tool.
And, there is a final step nobody talks about.
That is you need a website. I use geocities. And, then,
on your website, you need to tell people what or how
to use your *.zip or my self-extracting *.exe. For
the most part, they both work the same way:
they both unpack files and create directories as needed
based on where the *.zip or *.exe is located. But,
you need to explain that it will do that. Also, if using
the *.exe, you also need to explain that it does not
work directly from the internet. If you try to run it directly
from the website, your browser will create a temp folder and
run the *.exe there and it will then crash because it is
unable to create more temp folders. And, even if it did,
all files would be deleted by windows afterwords. So, both
require a full download to a valid directory before installation
can be done.
For fun, I uploaded the Final Build in a *.Zip and in my *.EXE
just to see the difference in size.
carrace.zip = 2.68MB
Pcarrace.exe = 2.83MB
carrace.exe = 10.5MB
Back to Top
Contact
Visit my website www.archonrpg.com
online for more fun free things.
Or email waffle
if you have any questions.
Back to Top
No Source Links
All links to source codes have been dissabled in this HTML doc. There are 3 downloads
available.
- Tutorial
Contains this doc, all source code and media. There is also
an executable included.
- Standard Source
Standard source code only. The has the macros replaced with
comments to be compatible with all DBC editors. Media and a
standard executable are included, but no tutorial doc.
- Executable only
This is a self extracting executable with embedded media. If you do
not wish to download the *EXE, there is also an
Zip version.
Back to Top